DLTK's Bible Crafts for Kids
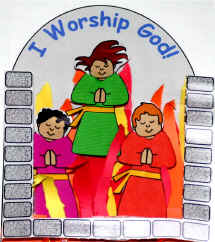
Shadrach, Meshach and Abednego Paper Craft
Contributed by
3D paper craft
with construction paper
option for flames
This can be a basic paper craft (cut and paste type project) for preschool children or a 3D paper craft for older children.
There are also some different options for making flames.
Materials:
- printer
- paper
- scissors
- glue
- something to color with (B&W version)
- option 1: red, orange and yellow construction paper
OR - option 2: red or orange tissue paper
OR - option 3: kitchen sponges cut into rough triangular shapes and red or orange tempra paint
Directions - Basic Paper Craft:
- Print out the template of choice.
- Color the pieces (as appropriate) and cut them out.
- Assemble the craft as follows:
- use markers to color some flames inside the furnace (the large shape) or see the OPTIONS section for different ideas for making flames (in the photo above, I used the construction paper option)
- glue the belts onto the bodies
- glue the heads onto the bodies
- glue the people into the furnace
- glue the rock border on top of the whole thing (line the bottom edge of the rocks up with the bottom edge of the furnace.
Directions - 3D Paper Craft:
- Print out the template of choice.
- Color the pieces (as appropriate) and cut them out.
- Assemble the craft as follows:
- use markers to color some flames inside the furnace (the large shape) or see the OPTIONS section for different ideas for making flames (in the photo above, I used the construction paper option)
- glue the belts onto the bodies
- glue the heads onto the bodies
- make 3 squares from 4 inch x 1 inch pieces of construction paper
like so
 (make 4 folds in each piece and then tape the ends together to make a
square) and glue one on the back of each body. Glue the
other side of the square to the paper. This will make the bodies
pop out from the furnace about 1 inch
(make 4 folds in each piece and then tape the ends together to make a
square) and glue one on the back of each body. Glue the
other side of the square to the paper. This will make the bodies
pop out from the furnace about 1 inch - Make 4 squares from 8 inch x 1 inch pieces of construction paper and glue them to the tops and corners of the rock border. Glue the border to the furnace so the bottoms line up. This will make the border pop out from the furnace about 2 inches.
- NOTE: instead of making little paper squares, you can glue a cotton ball on the back of each of the pieces to give the 3D effect.
Options - Construction Paper fire:
- tear pieces of red, orange and yellow into various sizes of "flame shapes" (rough triangles)
- Basic paper craft
- glue the larger pieces onto the fiery furnace before assembly
- glue the smaller pieces on top of the people before gluing on the rock border
- 3D paper craft
- glue the larger pieces onto the fiery furnace before assembly
- make small squares of construction paper in various sizes (4"x1", 6"x1" and 8"x1") and glue them on the back of the smaller flames
- glue the flames onto the craft so they're popping out at various
levels
Options - Tissue Paper fire:
- tear pieces of red and/or orange tissue paper into various sizes of "flame shapes" (rough triangles) -- really bright yellow can be used too, but a pastel yellow isn't colorful enough to work. Make sure you aren't using faded tissue paper.
- print the B&W version of template 1
- before you start gluing things together, lay the pieces of tissue paper all over the furnace and spritz with water with a spritz bottle or dab water on with a sponge
- set aside and let dry completely
- remove the dried pieces of tissue paper and throw away
- You should have died remnants of the tissue paper showing inside your furnace (the tissue paper coloring should have stained the white paper).
- Assemble the craft as instructed in the directions
Options - Sponge Painted fire:
- print the B&W version of template 1
- use a small triangular shaped sponge to sponge paint on red and/or orange
and/or yellow tempra or acrylic paint
- I usually just roughly cut a kitchen sponge into the desired shape
- I usually pour a little red and little orange and a little yellow together on a paper plate and just dip the sponge into the paint, not worrying about the colors mixing a bit. This gives it a nice mixed flame look.
- set aside and let dry completely
- Assemble the craft as instructed in the directions.
Templates:
- Close the template window after printing to return to this screen.
- Set page margins to zero if you have trouble fitting the template on one page (FILE, PAGE SETUP or FILE, PRINTER SETUP in most browsers).
Template 1 - Furnace (color) or (B&W)
Template 2 - Other pieces (color) or (B&W)
Printable version of these instructions