DLTK's Bible Crafts for Kids
David's Bag of Stones Craft
Contributed by
This craft is a variation of the pet rock that would work well for a David and Goliath Sunday School lesson plan. You can keep it simple and just paint the rocks or you can add glitter glue or hot glue on things like sequins or crystals. If you're going to play the game, just use paint -- glued on items will fall off after a round or two *grin*.
Materials:
- 5 fairly flat rocks (the kind you'd use to skip rocks on the water) - you can purchase small bags of smooth river rocks at garden stores, Ikea, Walmart, etc. (people put them in vases)
- 1 more flat rock for Goliath if you're going play the game
- paints in various colors (this is a good project for using up left over bits of paint):
- I prefer acrylic paint for this project, especially if I'm playing the game, but make sure the children where smocks as it won't wash out of their clothes
- if using tempra or poster paint, make sure they don't get wet (the paint will come off and make a mess on whatever is near by)
- paintbrushes
- water and paper towel for washing out brushes before switching colors
- permanent black marker (if you don't have one, you can use paint, but you might have to help the children as it's tougher to print with paint than with a marker)
- paper bag and markers
or
use the template included at the bottom of this page to assemble your own bag. To do this you need:- printer
- paper
- something to color with (if using the B&W version)
- scissors
- glue or tape
 Directions - stones:
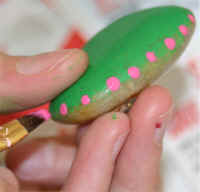
- have the children paint the 5 rocks however they like. Acrylic paint takes under an hour to dry (usually 15 min if you don't glob it on), so you can do a basecoat and then come back with different colors to decorate
- Let dry
 If you're going to play the game, glue a small piece of felt to the bottom of the rock.
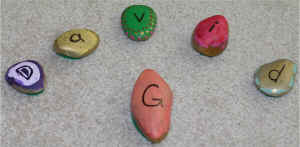
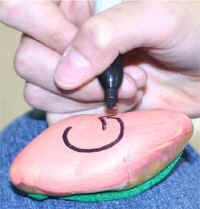 With the permanent marker, print one of the letters of David's name on each rock (use one capital D and one small d) -- D a v i d
- If you're going to play the game, put a G (for Goliath) on the largest rock.
- Optional: decorate further with glitter glue, sequins or crystals.
Directions - bag:
- For a paper bag:
- allow the children to decorate their bags with markers
- print a message on one side -- some ideas for messages include:
- 1 Samuel 17:47 And all this assembly shall know that the LORD saveth not with sword and spear: for the battle is the LORD's, and he will give you into our hands.
- Fully Rely on God
- Stay Close to God
- Trust in the Lord
- Once your rocks are dry, store them in your bag
OR
-
To make your own bag:
This is the pirate treat bag,
but the process is the same
- print out any two of the templates below (you need two templates to make one bag -- you can print the same one twice if you like)
- Place both of the cut out templates before you, face up.
- Glue the template on the right onto the glue tab of the template on the left.
- You should now have one long piece of paper.
- See diagram to the right if you're confused
- Imagine a line extending up from the dotted lines you cut. Fold along these imaginary lines, fold the GLUE tab and fold up the tabs for the bag's bottom
- Put glue on the glue tab (or tape) and glue it to the inside of the bag.
- Put glue on the tabs for the bags bottom and carefully press together.
- Add a bit of tape to make it extra sturdy (we're going to be storing rocks in here so want it to hold up.
- Once your rocks are dry, store them in your bag
Templates:
- Close the template window after printing to return to this screen.
- Set page margins to zero if you have trouble fitting the template on one page (FILE, PAGE SETUP or FILE, PRINTER SETUP in most browsers).
Templates: Pick 2 or print the same one twice
 I Samuel 17:47 |
 Fully Rely on God |
 David's Bag of Stones |
 Stay Close to God |
 Trust in the Lord! |
Printable version of these instructions