DLTK's Bible Poems for Kids
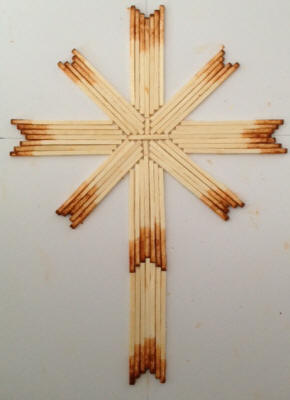
Burnt Match Cross Craft

grown up version
Contributed by
Marlene sent in a note asking if I remembered from my days as a girl how to make burnt match crosses. It took me a bit, but I do!
Jennifer sent in this helpful tip: "I have a suggestion for the burnt match crosses- we did them a few years ago at VBS and I was able to find rainbow matchsticks (no heads) at the local dollar store and craft store. When preparing for many kids this method cut down on time and dirty fingers (from the charred ends!)"

kids version
Grandma Gloria (my mom) was over when I was finishing up the instructions for this craft. When she saw me working on it, she shared this story with me.
Back when mom was just beginning her teaching career, she had a student, named Carol, whose father was ill. Carol was a quiet, diligent student who mom liked very much. Sadly, the father passed away.
It was mom who had to break the news to Carol. It's not something they teach you how to do in university. Mom is a sensitive woman and she remembers it as one of the hardest things she's had to do.
Soon after, Carol brought in a matchstick cross that she'd made for my mom as a recognition and as part of the healing process. When mom saw the cross we'd made at home, she remembered the story and asked if I might add it to the site.
Materials:
- Box of matches or rainbow matchsticks
- cardboard
- glue
- an adult to help with the first step.
Instructions: STEP ONE
Burning the matches
This is NOT for children to do. I would even argue that (neat as it looks) kids should not be allowed to watch this step.
You can burn the matches one at a time and blow them out quickly so just the ends are charred. But if you're making a grownup cross, it's going to take 120 matches or so and if you're making crosses with a group of kids, you'll be blowing out matches for days! So... here are two quick methods for doing it.
(Make sure you have a towel and glass of water handy to extinguish any rogue flames. It's never happened to me, but better safe than sorry.)
METHOD ONE: Stacked Matches.


OR

- Put the number of matches you need stacked with the ends lined up in the box.
- If you're doing loads of matches, fill up to 3/4 of the box at a time (I only ever do 1/2 the box to be safe). You have to leave some of the box empty to provide enough fuel (oxygen) for all the match tips to burn. If not all of your matches burn, you have your box too full.
- Put the lid on 1/2 way (empty side showing) -- my husband prefers this way.
OR - Put the lid on almost all the way (match ends showing) -- I prefer this way.
- Light a match and drop it on the match ends
- If you used the 1/2 way closed box method, slam the lid shut (it doesn't have to be completely closed). If you used the almost all the way closed box method just stand back
- Stand back
- a flame will shoot out of the box
- You can reuse the box a few times
METHOD TWO: Kissing Matches.


This way takes a bit longer to set up, but works every time.
- Position two or three layers of matches end to end
- Put the lid on 1/2 way
- Light a match and drop it on the match ends
- Slam the lid shut (it doesn't have to be completely closed)
- Stand back
- a flame will shoot out of the box
- the ends of the matches will be burnt and the fire will not have enough oxygen to keep burning.
Instructions: MAKING THE CROSS

Alrighty then... all of that was just to burn the matches! Now we have to use them for something.
Kids Version
- on a piece of cardboard, draw a vertical line right down the center.
- draw a horizontal line about 1/3 of the way down from the top
- it's much easier for the kids to construct their cross on a full piece of cardboard than a cut out one.
- We used plain brown cardboard, but you can get a nice colored cardstock or poster board to set off the cross (maybe blue or green)
 It doesn't matter how many matchsticks you use, you just have to make them symmetrical. We used 5 sticks for each of the slanted parts
and 7 sticks for each of the horizontal and vertical parts. We found this a nice number for our 7 year old.
It doesn't matter how many matchsticks you use, you just have to make them symmetrical. We used 5 sticks for each of the slanted parts
and 7 sticks for each of the horizontal and vertical parts. We found this a nice number for our 7 year old. Starting with the slanted parts, glue the sticks on so the middle stick is in the corner (where the lines you drew intersect). The other
sticks should be lined up along the vertical and horizontal lines you drew.
Starting with the slanted parts, glue the sticks on so the middle stick is in the corner (where the lines you drew intersect). The other
sticks should be lined up along the vertical and horizontal lines you drew.
 Continue adding the slanted parts until all 4 are done
- the kids used a lot more glue than needed *laugh* Oh well, they had fun
- Once all 4 slanted pieces are done, start adding the vertical and horizontal pieces. The bottoms of the matches should touch the slanted pieces.
- the bottom of the cross has two rows of matches instead of just one.
Grown Up Version:
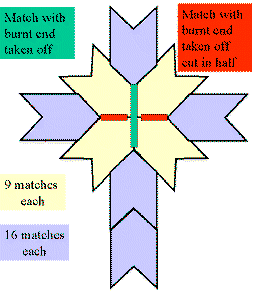 this is identical to the kids version, but you'll likely want to use more matches (we did 9 match slants and 15 match vertical/horizontal sections)
- You may also want to cut out your base so that it will be totally covered by matches (you won't be able to see the cardboard). I've provided a template for this (just trace it onto a piece of cardboard)
Template:
- Close template window when done viewing to return to this screen
TEMPLATE FOR GROWN UP CROSS
Sandi wrote...
"When I was looking for Easter crafts for our Sunday school I came across your burnt out match cross and thought it looked great.
Like you, I wasn't too keen on the match burning around kids and thought I would experiment with the craft match sticks and an ink pad. I like the results, I am even thinking of trying it with some other colours. This would allow the kids to be part of this step too. "
Printable version of these instructions